
15 May 2024
I built myself a raku kiln from recycled materials
In this post I'll tell you how the design and launch of this crazy project went. I'm taking the liberty of including links to some of the affiliate items I mention in the post, so that anyone who wants to dive into the adventure has an easier time of it.
Two years ago, in the first days of summer, my father and I set off on an exciting adventure: the Lowcost Kiln project. It all started with an unexpected gift from my husband: a book by Tim Andrews, Raku Second Edition. In its pages I found a mine of valuable information, and among its tips and tricks, I discovered how to build a kiln myself.
Inspiration and Creativity
Tim Andrews' book became my guide. His words pushed me to explore ceramics and to create something unique. But there was a challenge: I wanted to do it as cheaply as possible. So, armed with my determination and a few recycled ideas, I threw myself into the project.
The Design and the Materials (at the end of the post I include a link to the reel that shows a visual summary of the detailed process)
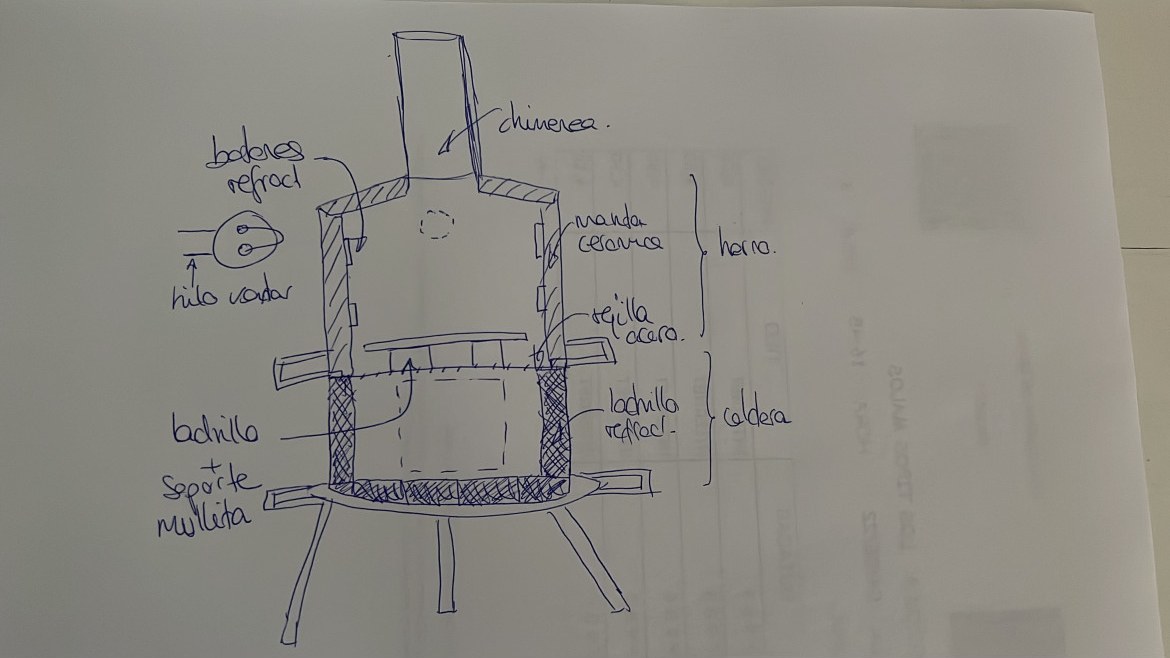
As you can see in the freehand design that accompanies the post, our base would be an old washing machine drum. Its sturdiness and heat resistance made it the perfect candidate. On top of this base, we placed three refractory bricks (salvaged from an old storage heater) and a refractory shelf (reused from my electric kiln). The structure was taking shape.
The kiln's hood (it would be removable) deserves a special mention. We used a modified drum, to which we added a peephole to measure the internal temperature. The peephole was like the curious eye of our project, watching the firing process.
Also three handles so we could place and remove it safely. Plus a skirt to secure the drum onto the base.
All these modifications were made by my father, who is an ace with the blowtorch.
To insulate the kiln, we lined the inside of the drum with ceramic fibre blanket. The buttons made with grogged clay (high grog content so they'd be more resistant to thermal shock), made by me, held the blanket in place, and with the kanthal wire we made sure everything was well tied down.
The whole process of lining the kiln was very delicate, since handling the blanket is dangerous and requires additional protective measures, such as goggles, a mask and covering your skin well.
And of course the chimney couldn't be missing. Strategically placed at the top of the kiln, it would allow ventilation and release the gases during firing.
Temperature Control
To make sure the kiln reached the optimal temperature for firing raku, we used an infrared pyrometer. This device, similar to the one used in forges, let us measure the temperature accurately. We found it on Amazon and it turned out to be an invaluable tool for our project.
How It Works
Wood as Fuel: We would light the wood at the base of the kiln. The wood burned, providing the heat needed for firing. The smell of burning wood mixed with the excitement.
Preparing the Ceramic Pieces: Before placing the pieces in the kiln, we would glaze them (I used Base 5, which has a very low temperature, in case it didn't turn out well, and some commercial glaze) and I would also decorate with copper sulphate. Each piece had its story, its personality. Raku is known for its crackle effects, and we wanted to capture that magic.
Firing and Cooling: The kiln reached the right temperature (between 900 and 1000 degrees). The firing is fast and exciting; in barely 3 hours we reached the highest point of temperature, and from there our effort goes into holding it to achieve the temperature plateau and let the glaze develop properly. Then we would take the pieces out and plunge them into sawdust so that, as we covered them, the smoke would seep into the cracks that the temperature change produces in the glaze. This creates astonishing effects.
Conclusions
The Lowcost Kiln project was more than a physical build. It was an exploration of creativity, passion and connection with nature. Every ceramic piece that came out of our kiln had a unique story. And we, as father and daughter, were part of that story.
So here we are, two years later, sharing our adventure with the world. I'd had it on my to-do list for a while, but I hadn't gathered together the material we used during the process. I hope this account inspires others to create, to recycle and to find beauty in the unexpected. May the summer heat not stop your projects! ???
Related videos
Videos embedded from Instagram (Meta), which may set its own cookies. They load when you reach this section.
12960
Comments(0)
No comments yet. Be the first to write one!